Introduction to Needlepoint and the equipment you need.
First of all, what is
needlepoint? It is counted thread
embroidery mostly covering the ground material – even weave canvas. However my web site shows many different lacy
designs and incorporating different coloured canvases into the design. Sometimes
it is called tapestry erroneously but that is a different story!
There are three main types of needlepoint, Tent stitch from
charts or on printed or hand-painted canvases; Florentine/Bargello traditional
upright stitches worked in curves and spires and Stitchery on geometric designs
and for adding interest to painted canvases.
I design and stitch all the projects we offer on class or
the web. So, while I stitch a great deal
I can only tell you of the items I can’t do without and find essential to my
stitching pleasure. There are many, many
others I haven’t mentioned as I’ve not tried them or find non-essential.
A frame is essential
– in my book anyway – the type that is best to use are artist stretcher
bars. They come in pairs in different
lengths and widths and simply slot together - very easy to store and use. The lengths you need are the same as the
canvas dimensions, a 10 x 10 inch canvas needs a 10 x 10 “ frame. The narrow ones we can supply are light and
best fitted with flat headed drawing pins. They can be reused time and time
again and will fit with other lengths of the same width to make rectangles etc
for future projects. It is always possible to order a frame at the same time as
a new project.
Later on when more confident, stranded and pearl cottons add
interest to designs and when hooked overdyed floss, silks and metallic, are
beautiful to work with and look marvellous. New, exciting threads are
introduced all the time – I try and incorporate them in my designs. In my kit instructions
these threads are explained when applicable.
Think how much a set of golf clubs would cost!
www.anna-needlepoint-pearson.com
 |
| Girls Stitching in Tuscany |
This blog covers equipment for all types of needlepoint that I have found useful though the years.
One of the most attractive aspects of learning needlepoint
right from the start is the fact that initially very little equipment is needed
to get one going in the right direction.
Later on as you become more hooked, possibly see fellow
stitches either at class or in ‘stitch and bitch’ groups with equipment they
love you can add on or build as you wish.
 |
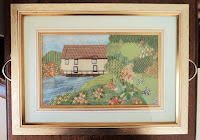
| Anna's Mill in Norfolk |
I expect the first thing to talk about is the kit or design
you pick first time around; we hold
regular open days when people are able to see our range, discuss whether it would
be right for their standard of stitching; which colour scheme would best suit
their home. Failing that our web site
does show full details of the colour schemes and one can hover over a design to
see detail.
If a design from another designer do not go for anything too
large; I would reject screen printed designs on interlock canvas, any design on
Double or Penelope canvas. 12 or 14 mesh evenweave are good to start on. Crewel wool is the best option (see later) Finally check the design doesn’t only allows
for half-cross stitch as that doesn’t wear well. If you should work a background in Basket
weave/Diagonal Tent instead of the suggested Half Cross you will not have
enough of wool supplied and finding a match could be difficult so better, right
from the start, to have fresh background wool of the right quantity. Check quantity in any event by stitching a
square inch in the stitch you plan to use on the identical canvas and recording
the number of threads used.
Canvas Besides
the canvas mesh, (the higher the number the finer the canvas, eg 14 threads to
the inch is larger than 18 threads to the inch) there are three main types of
canvas, Penelope or Double, Interlock and Evenweave.
Our kits come complete with the evenweave, when the canvas
threads weave over and under each other allowing for some give and take when
the piece is finished and in use.
The 14 and 18 mesh are available in white and antique
(brown) so choose the colour to best suit your colour scheme. The 18 mesh also
comes in an exciting range of colours, both pastel and dramatic.
 |
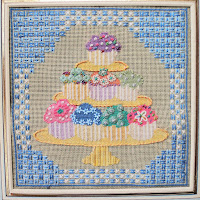
| Cakes stand |
Threads, probably the best choice for your first attempts is crewel
wool. Appleton’s make a wonderful range
of closely shaded families, particularly good for shading realistically and
Florentine/Bargello designs. It is
available in small skeins and larger hanks; I recommend the hanks as one
frequently wishes to do further designs in the same colour scheme. Work with lengths no longer than18/19 inches
to prevent fraying. If working with a finer canvas 18/20/22 mesh consider an
even shorter length.
 |
| Joint teaching project with Dede Ogden |
So, now you are set up to make a start - a kit or
instructions in a book you love, the colour scheme that suits, a frame and of
course needles! If and when you wish to
change a colour scheme from that given, it is most satisfactory to replace wool
with wool, stranded cottons with stranded cottons etc.
Needles are usually given in kits however you need ‘tapestry needles’ that have no point
that would split the canvas threads.
They are available two ways, in a mixed pack or an individual pack of
one size – these I find better.
As a rule,
Size 18 is for 12 mesh canvas
20 for 14 mesh canvas
22 for 18 mesh canvas
Exceptions to these rules that are worth considering - for
Pulled Thread stitches I use a larger size than recommended to enlarge the
holes effortlessly and I enjoy using a
fine 24 needle for lacy stitches on 18 mesh.
Recently I have discovered a French needle manufacturer that
are markedly nicer to use; these are now included in our kits and available
from us in packs of 6.
For those of us who have problems threading needles (I find
the French needles much easier) there is an excellent 3 in 1 Needle Threader; it
can thread sewing cotton on a fine wire loop, medium threads on a hook and
thick threads on a large hook.
Binding the edge of
the canvas; most often our canvases are taped before sale; otherwise the
edges of the canvas should be bound with 1” masking tape.
Stitching with others
is always a bonus, there may be classes in your area where you will get
useful tips that will help all future work, there may be a ‘stitch & bitch’
group that meets in a private home, there you would see other people’s
work. All group stitching be it in a
formal class or informal group gives you the opportunity of discussing your
work, making new friends and generally swopping ideas. Highly recommended.
 |
| Crewel wools & threads, range of coloured canvases and stretcher bar frames |
Then, when you are ready, you might think of adding to your
equipment; there are small items to pick up and others, more expensive that are
really helpful to your work and pleasure.
Among others the small items are scissors, laying tools, needle
cases, thread storage and project bags and magnetic pick up tools for finding
and rescuing your needle.
Until recently I loved some small curved decoupage scissors
but they appear to be no longer available so I am researching alternatives. The
curved tips get under waste knots with easy. The airline authorities generally
accept blades under 4.5mm but perhaps it is wise not to rely on this, pack a
spare pair in your check-in and have a thread cutter for the flight. The ones I
like are a Japanese ‘disc’ that I wear as a necklace or a cheapo airline
cutter. Group photo of small accessories.
If you plan on cutting canvas then a larger pair of shears
would be useful (not to be taken on board!)
Unpicking work is often unavoidable and the two tips I offer
are - There is often more thread on the reverse making it easier to snip; the
curved scissors are good. Finally use eyebrow
tweezers (or any tweezers that you have) for pulling the cut stitches out.
Laying tools come
in various materials, polished wood, metal and plastic; They help your threads,
particularly cottons, floss, and perle
to lay smoothly; in particular any
thread that you use with a number of ply.
My favourite are the wood versions but many of my students
like the ‘trolley needle’ a laying tool that fits on a finger always at the
ready. Try for yourself.
Needle cases
again come in many forms; one can make a
small ‘book’ with flannel ‘leaves’ and a canvas work cover or recently I have
found a pop-up that holds all sizes of needles or if needed a pop-up for each
size. There are amusing copies of pewter
Victorian animals with padding for the
needles – a great present for friends who stitch.
Then comes a method of keeping your threads under control! The one I like and use often is a heavy card
with various size holes to accommodate the selection of threads (wool is more
bulky than say stranded cotton) I use these as I can record reference numbers,
quantities used and ideally the code that the kit has used for that
colour. Now these cards are included in
our larger kits.
Then transporting your precious project, or even just keeping it
all together. The simplest way is an old pillow case, a more sophisticated
method of transport is making yourself a large tote bag; make it generous
enough to take the size of canvas (left on the frame) you usually work on and
it can be fabric or needlepoint – either just the front or both sides and a
shoulder strap all in needlepoint – I suggest a longish strap to go over the
shoulder and leave both hands free |
| Needle threaded, Magnetic Pickup, Project card, Tweezers, Needle holder & a Needle case |
So, now take a breath, you love your stitching and to make
it even more pleasurable; these items will help immensely.
A floor frame to hold your piece at both
the right height and angle; good for your back if you need further
justification! My absolute top favourite is the Lowery floor
frame, the silver grey version with a side clamp. The big advantage over many on the market is
that it has a good floor plate that, with your foot or chair leg is rock solid
and that it stands to the side of you and leaves both your hands free for
2-hand stitching. It also has a useful
range of add-ons illustrated on their site. Many others come centrally into your body and
should you need to get up for the telephone or a well earned coffee, go
flying! I always have some of these Lowery
floor frames that students can try on class. I even have some students who have taken a
second one – for down and upstairs or in their weekend cottage. Having said that they are not impossible to
pack as they all come apart!
Then there is light
and magnification - daylight can’t be beaten but most of us stich in the
evening and frequently in the winter with curtains drawn with lights on quite
early. So I am spoilt in having two
types, each of which I love. First
there is a wall mounted magnification and light; it has a large magnification
area so I can see the whole design area without too much adjustment. It does come with a floor base but mine is
fixed with a bracket to a wall but could be clipped to a table or window
cill. It lives right by my stitching
chair. It needs a power point for the
light.
The other version is even more adaptable; it can be connected
to power but will also work on batteries; it comes with a solid floor base but
can also be used alone with a strong clip for a table top or similar. This is
the one I take for travelling (without the base if I know there will be a
suitable table to clamp it to)
Again both these items are here in the studio, I encourage
people to try them and see which would suit them best.
 |
| Lowery floor frame (canvas on artist stretcher bar frame) & Magnification / Light (works on electricity or battery) |
So, step by step you have items that truly make stitching
even more pleasurable and not expensive or difficult to get.
www.anna-needlepoint-pearson.com


Very insightful Embroidery Digitizer
ReplyDelete